Documentation
Feedlight user guide
Feedlight is a local-first RSS reader for macOS. Everything — your feeds, articles, highlights, and settings — lives in a SQLite database on your Mac. No accounts, no cloud, no telemetry. This guide covers installation, configuration, and every feature in the app.
Installation
Feedlight ships as a universal macOS app (Apple Silicon + Intel). Requires macOS 13 Ventura or later.
- Go to the latest release and download the
.dmg. - Open the
.dmgand drag Feedlight into your Applications folder. - Launch it from Applications or Spotlight.
Build from source
If you'd rather build it yourself, you'll need Rust 1.80+, Node.js 18+, and the Xcode Command Line Tools.
git clone https://github.com/nishanshetty/feedlight.git
cd feedlight
npm install
npm run tauri dev      # development build with hot reload
npm run tauri build    # production .dmg + .app
The production build is written to src-tauri/target/release/bundle/.
First launch
The release builds are not notarized by Apple, so the first launch needs one extra step. If macOS says the app “cannot be opened because the developer cannot be verified”:
- Click Cancel on the dialog.
- Open System Settings → Privacy & Security, scroll to the Security section, and click Open Anyway next to the Feedlight notice.
- Confirm Open. macOS remembers this — you only do it once.
Prefer the terminal? xattr -dr com.apple.quarantine /Applications/Feedlight.app clears the quarantine flag in one step.
Quick start
Three ways to fill your timeline in under a minute:
- Add a feed by URL — paste any site or feed URL into Add Feed in the sidebar. See Adding feeds.
- Pick from Discover — a curated catalog of quality feeds you can subscribe to with one click. See Discover.
- Import OPML — bring your whole subscription list over from Feedly, Inoreader, or any other reader. See OPML import / export.
Adding feeds
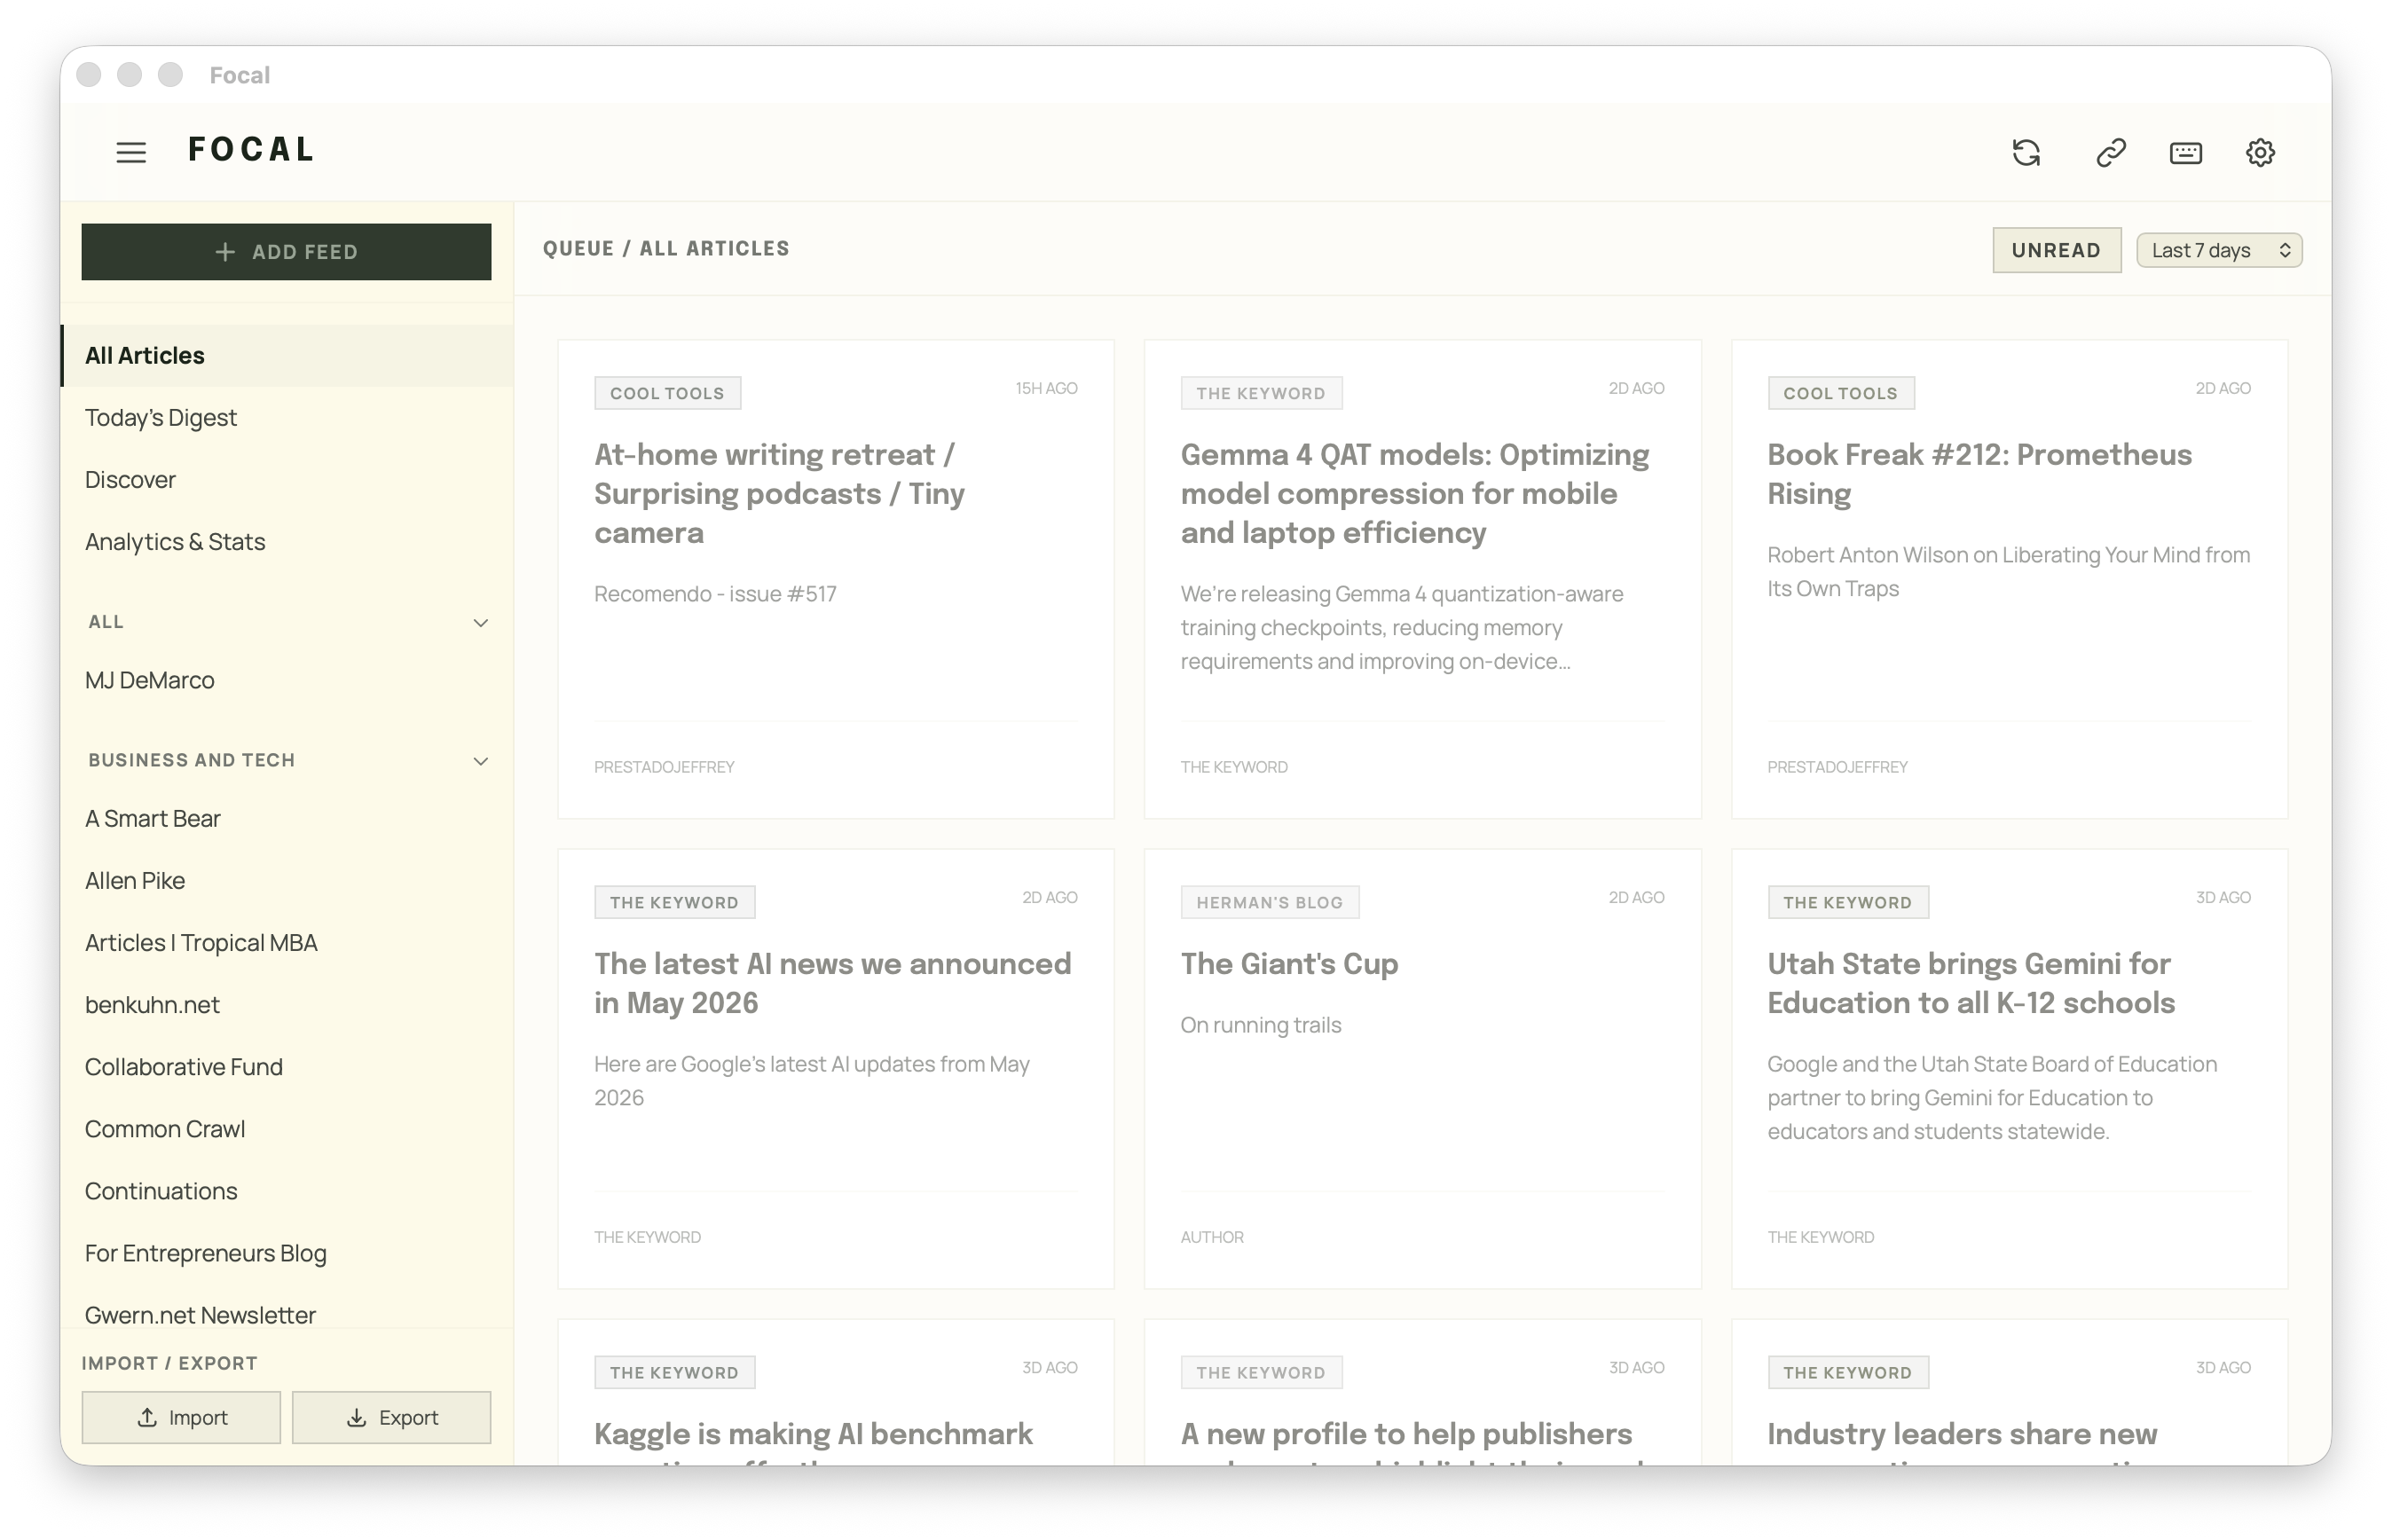
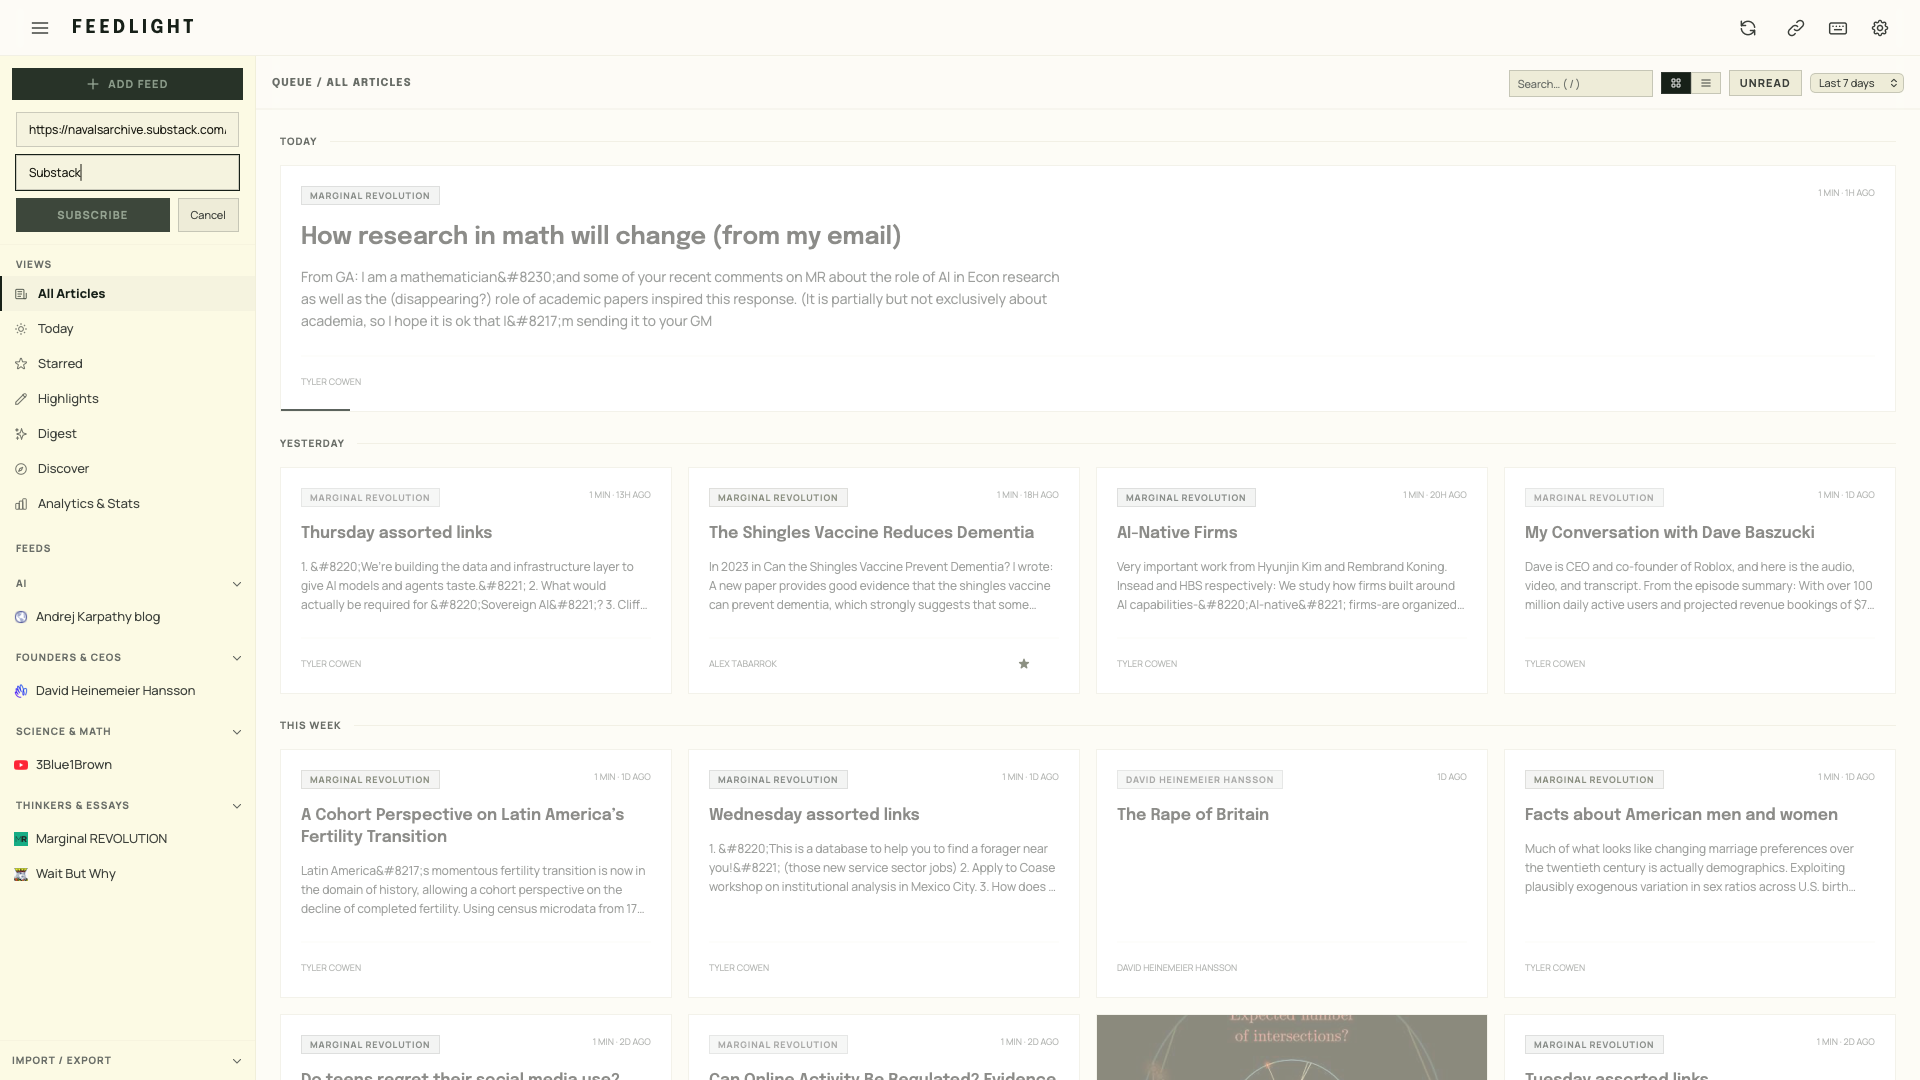
Click Add Feed at the top of the sidebar, paste a URL, and hit Subscribe.
You don't need the exact feed address — paste a site's home page (for example https://example.com)
and Feedlight auto-discovers its RSS or Atom feed. You can optionally type a Folder name to
file the feed straight away (existing folders autocomplete).
Feedlight understands:
- RSS and Atom feeds — by direct feed URL or by site URL (auto-discovered).
- YouTube channels — see below.
YouTube channels
Subscribe to a YouTube channel and its uploads land in your timeline like any other feed. Three URL forms work:
youtube.com/channel/UC…— works out of the box.youtube.com/user/name— works out of the box.youtube.com/@handle— requires a free YouTube Data API key (Feedlight uses it to resolve the handle into a channel ID).
To use @handle URLs, add a key in Settings → YouTube. Get one from the
Google Cloud Console →
APIs & Services → enable YouTube Data API v3 → create an API key.
Discover
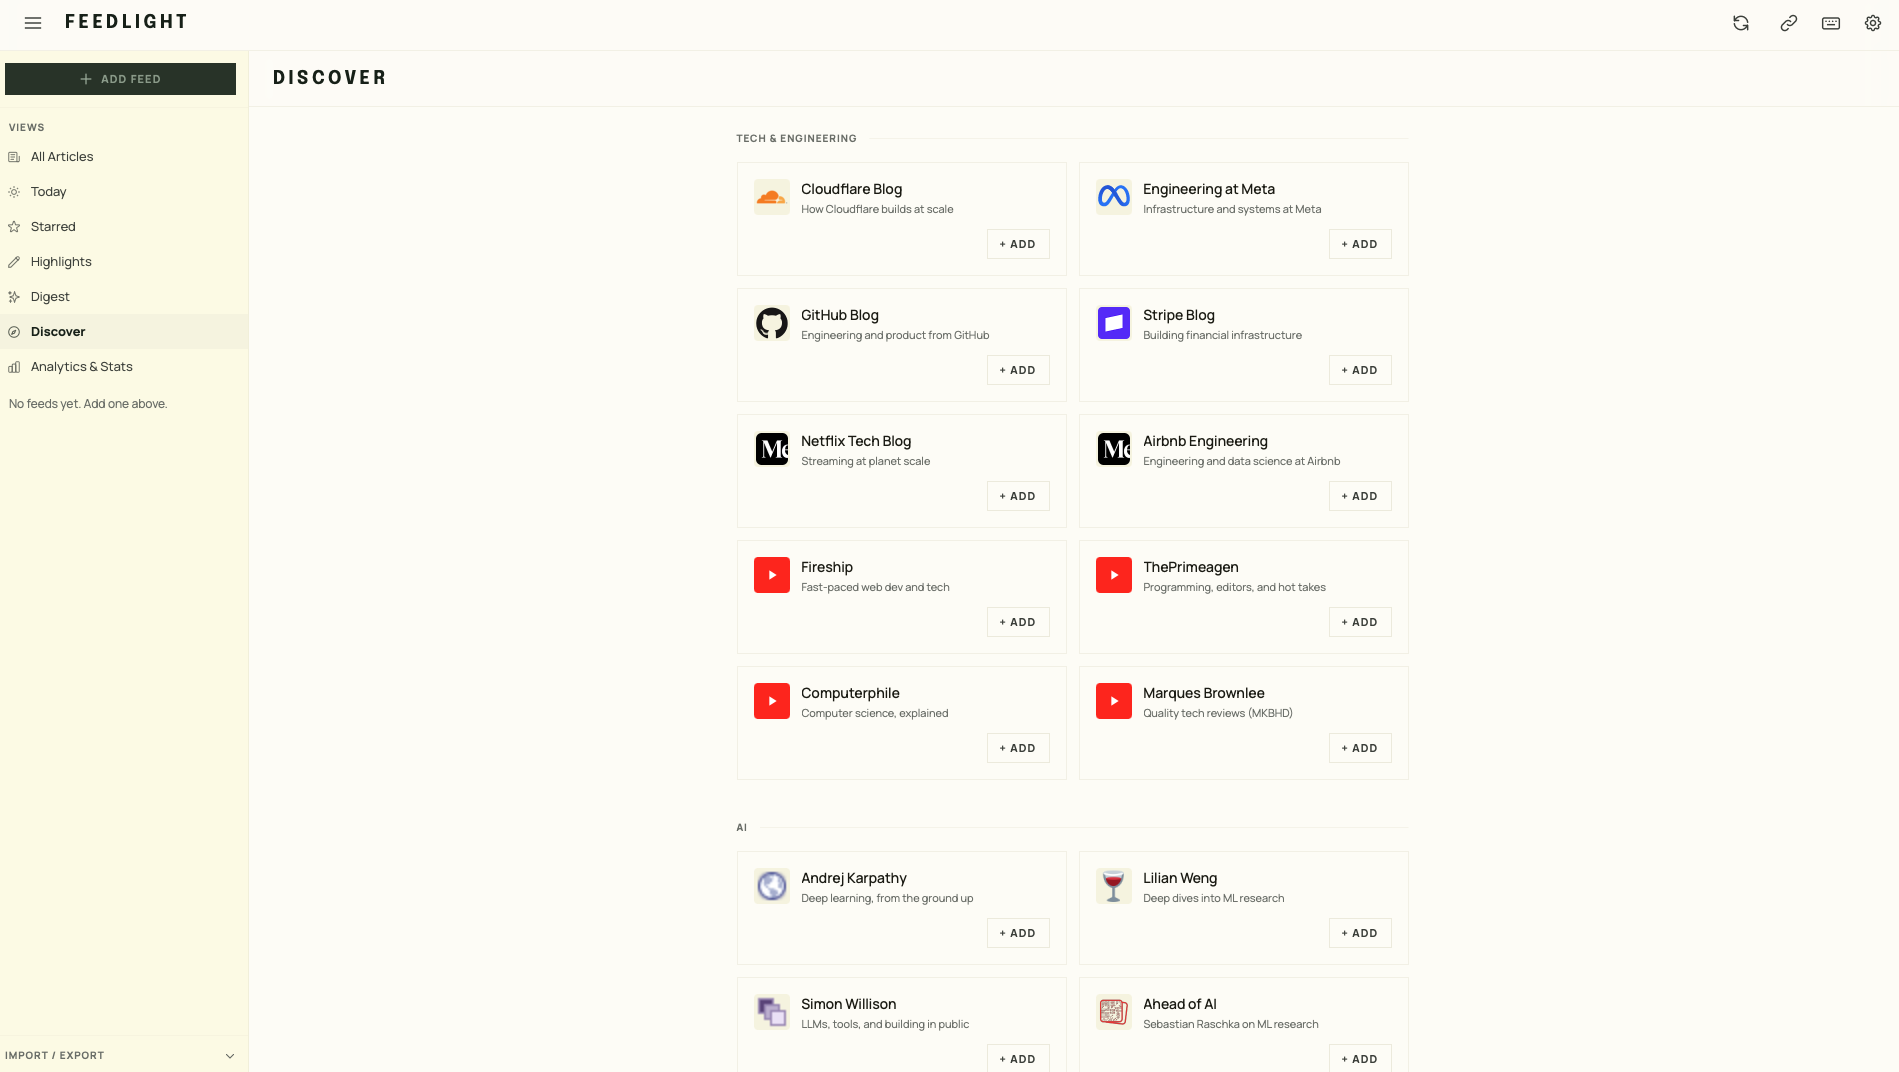
The Discover view is a hand-picked catalog of quality feeds grouped by topic — Tech & Engineering, AI, Science & Math, Founders & CEOs, Psychology & Mind, and Thinkers & Essays. Click + Add next to any feed to subscribe instantly; feeds you already follow are marked Subscribed. It's the fastest way to seed a fresh install with good sources.
Folders
Organize feeds into folders to keep the sidebar tidy. You can set a folder when adding a feed, or change it later: hover a feed in the sidebar, click the ⋯ menu, and choose Move to folder (pick an existing folder, type a new one, or remove it from its folder). The same menu has Unsubscribe. Folders collapse and show a combined unread count; each feed shows its own unread pill and site favicon.
OPML import / export
OPML is the standard interchange format for feed subscriptions, so you can move in and out of Feedlight freely. The Import and Export buttons live in the sidebar.
- Import — pick an
.opmlfile exported from another reader. Feedlight fetches each feed, preserves your folder structure, skips duplicates, and reports how many were added, already subscribed, or failed. - Export — writes all your subscriptions (grouped by folder) to a dated
.opmlfile you can back up or import elsewhere.
The timeline
The center column is your reading timeline. The sidebar's Views section controls what it shows:
- All Articles — everything from every feed, newest first.
- Today — only articles published today, with its own unread count.
- Starred — articles you've starred for later.
- A single feed or folder — click any feed or folder name to filter.
Within the timeline you can:
- Search — press / and type to full-text search across titles and content.
- Switch density — magazine-style cards (with images and a hero lead story) or a compact list.
- Resume reading — cards show a progress line; reopening an article scrolls back to where you left off.
- Mark read / star — per article, or Shift+A to mark everything visible as read.
Articles are grouped under date headers, and the timeline loads more as you scroll. See Keyboard shortcuts to fly through it hands-free.
The reader
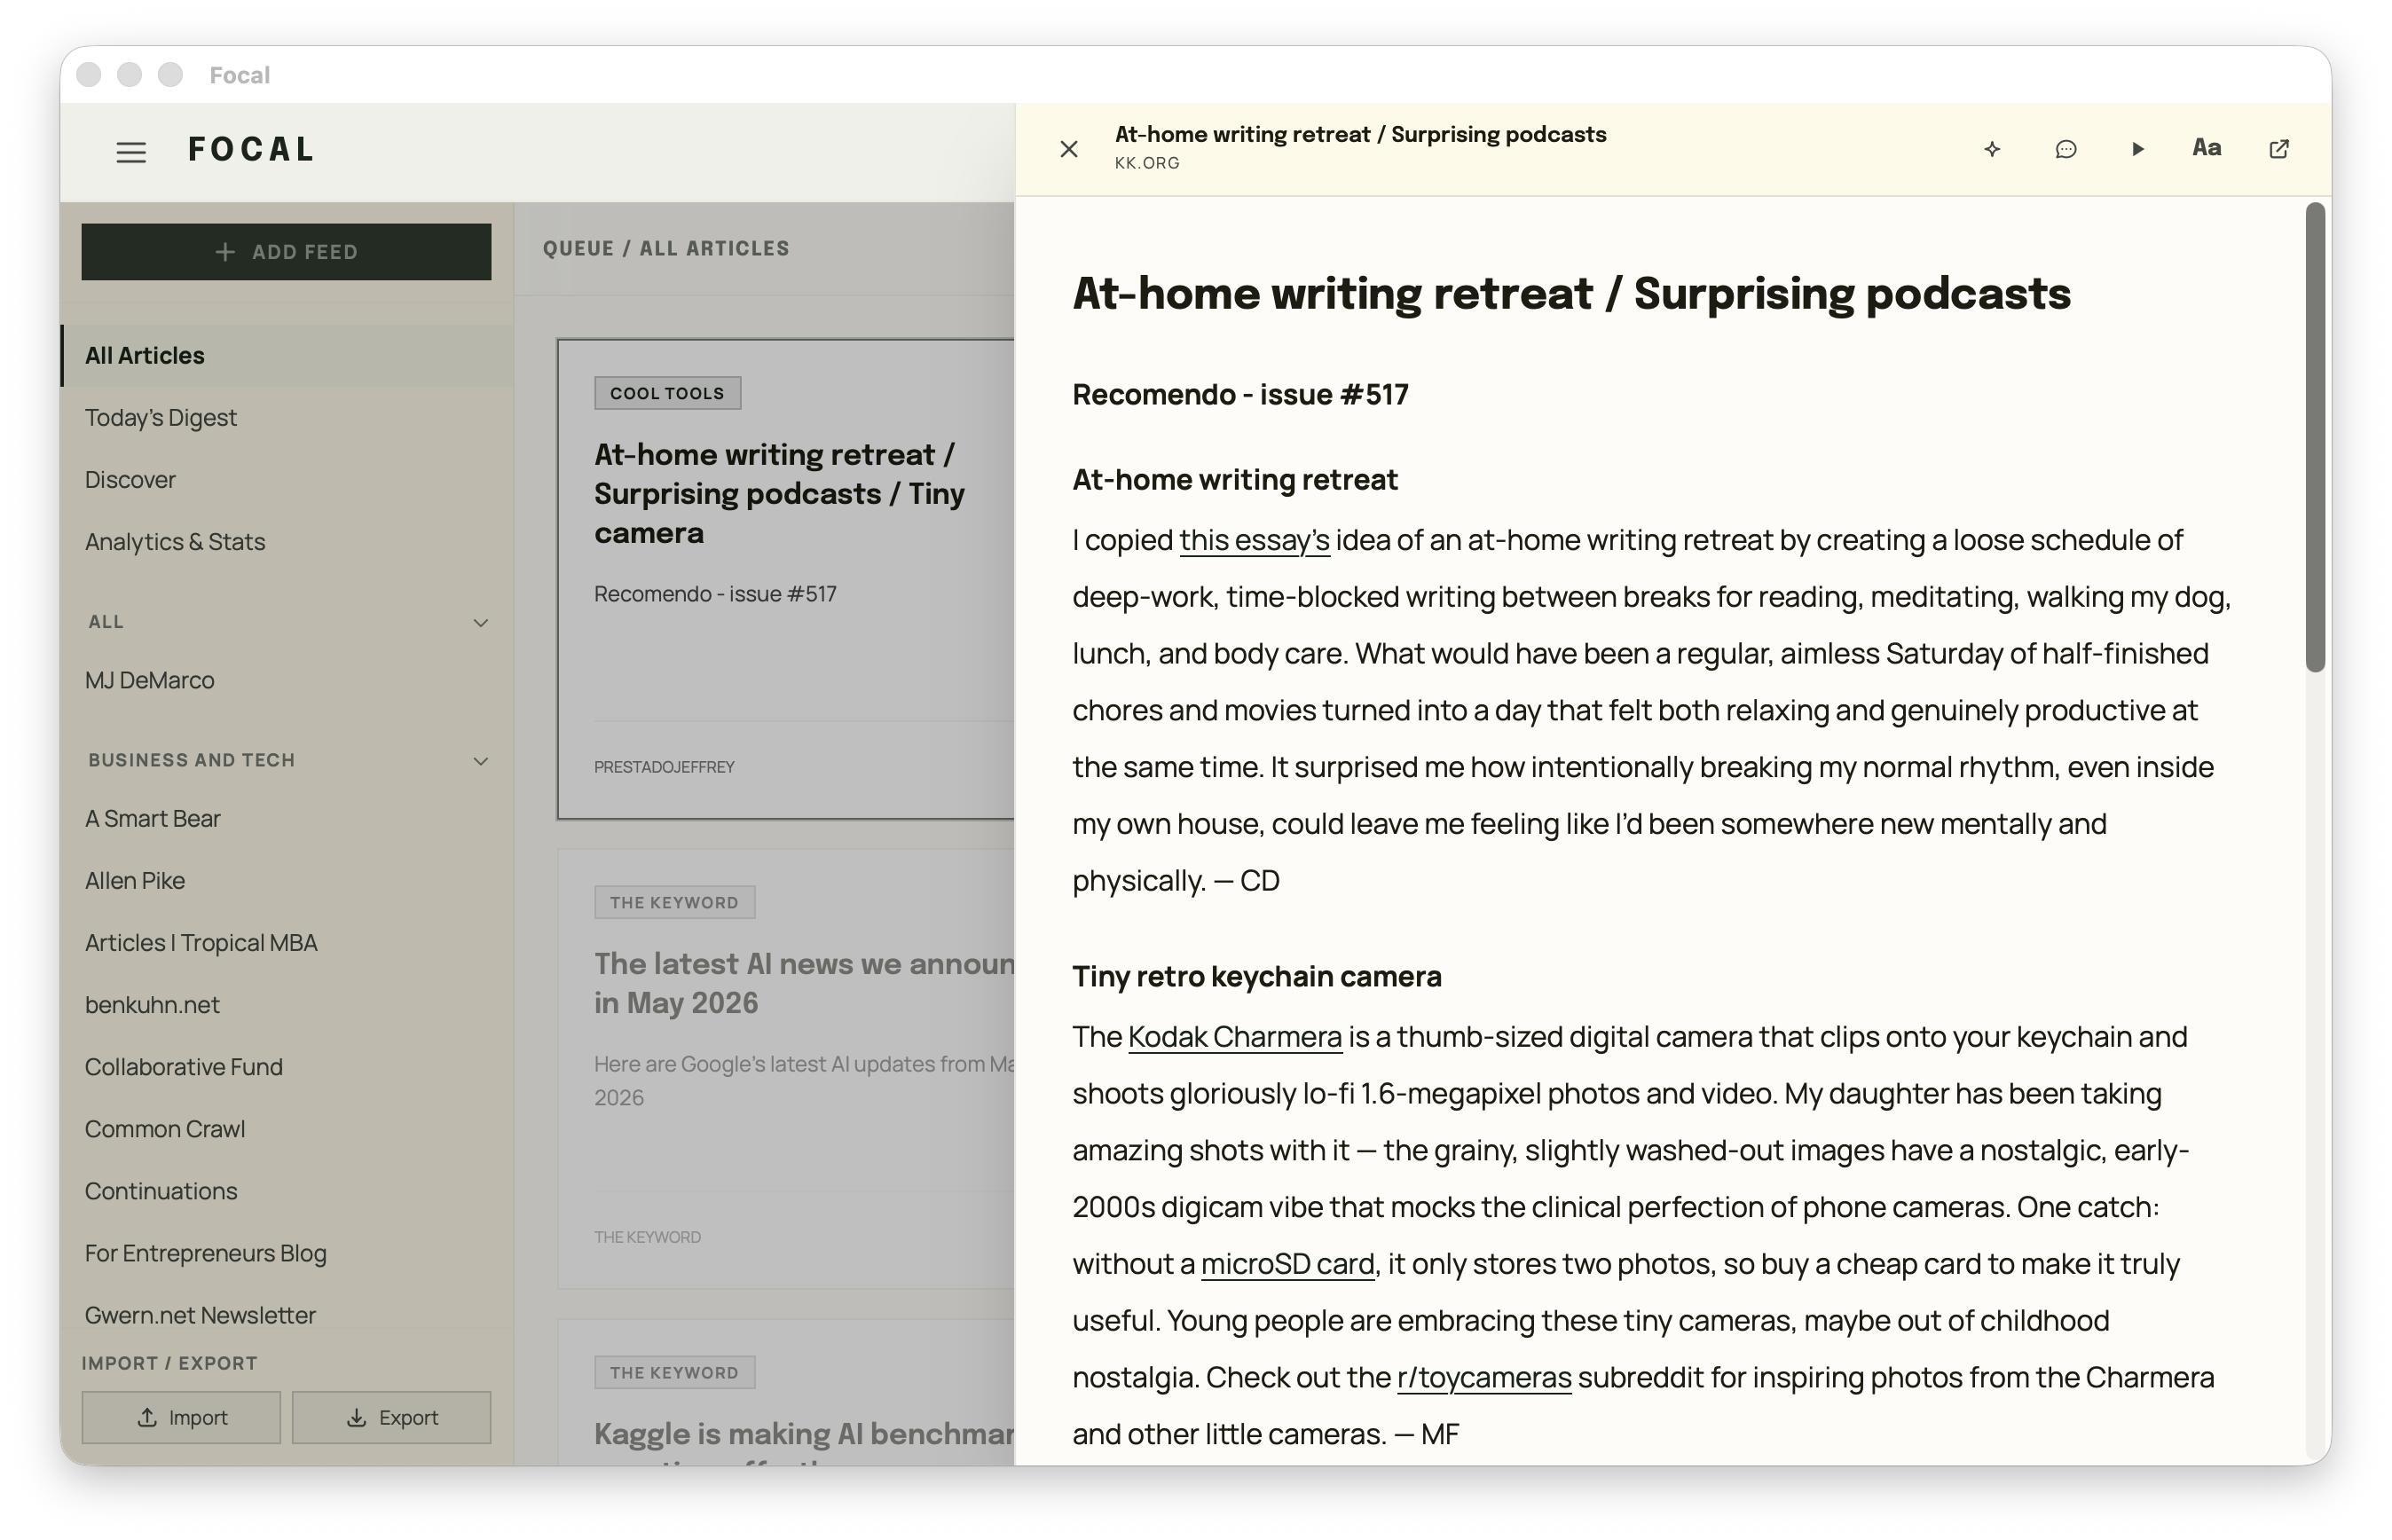
Open any article to read it in a distraction-free pane powered by Mozilla Readability — the same extraction engine as Firefox's Reader View. Ads, navigation, and clutter are stripped away, leaving just the article, a reading-progress bar, and a read-time estimate. The accent color is drawn from the article's lead image.
Click the Aa button in the reader header to customize the reading experience:
- Theme — Auto (follows the app theme), Light, Sepia, Slate, or Dark.
- Font — Sans-serif, Serif, or Monospace.
- Font size — 12–22px.
- Width — column width.
- Spacing — line height.
Your choices are remembered. The open-in-browser button (top right) opens the original page in your default browser.
Highlights & notes
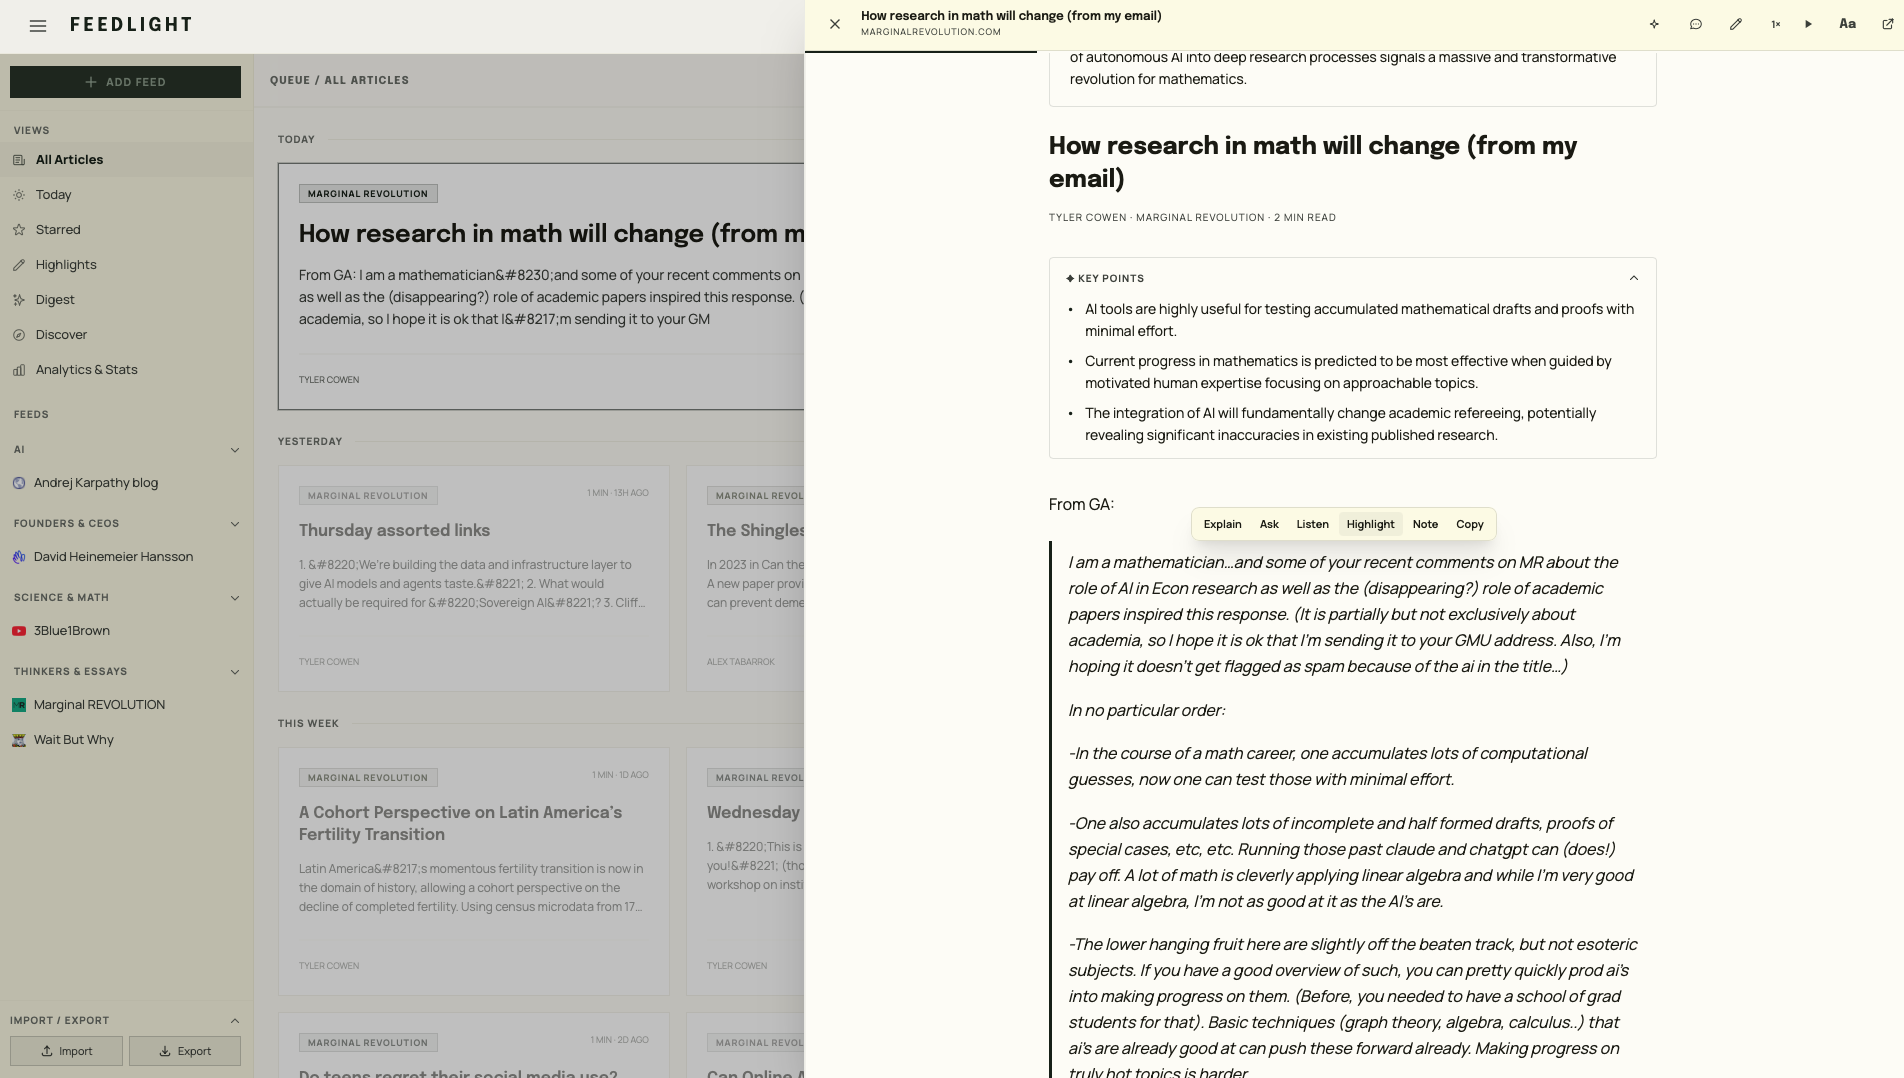
Select any text in the reader and a small toolbar appears. From it you can:
- Highlight — save the passage. It's marked in the article and added to your Highlights.
- Note — highlight the passage and attach a note. Click any highlight later to edit its note.
- Explain / Ask — send the passage to the AI chat (see AI features).
- Listen — jump text-to-speech to that paragraph (see Text to speech).
- Copy — copy the selection.
The Highlights view in the sidebar collects every highlight, grouped by article, with its note and date. From there you can Copy an article's highlights as Markdown, open the source article, delete a highlight, or Send to Obsidian (see Obsidian export).
Text to speech
Feedlight can read articles aloud, highlighting the current paragraph as it plays. You can pick a voice engine in Settings → Read Aloud:
- System — the voices built into macOS. Free, offline, and need no setup.
- Google — Google Cloud's higher-quality voices (including Neural2). Needs a Google Cloud API key and is billed to your own Google account.
Using Google Cloud voices
System voices work out of the box. To use Google's higher-quality voices instead:
- In the Google Cloud Console, enable the Cloud Text-to-Speech API.
- Create an API key (APIs & Services → Credentials → Create credentials → API key).
- Paste the key into Settings → Read Aloud, then choose the Google engine.
- Pick a language and voice — any voice Google offers is available (the default is
en-US-Neural2-F, a female voice).
Listen
In the reader header, press Listen (the speaker icon). Controls let you Pause, Stop, and cycle playback speed. Click any paragraph — or use the Listen button in the selection toolbar — to jump playback to that spot.
Your API key is stored locally on your Mac via tauri-plugin-store; audio is synthesized through your
own Google Cloud project, and standard Google Cloud TTS pricing applies. System voices stay entirely on your Mac.
AI features
Feedlight's AI runs entirely on your own machine through Ollama — a local LLM runtime. Nothing is sent to a cloud service, and there are no API keys or usage fees.
Set it up
- Install Ollama and pull a model:
ollama pull llama3.2 - Open Settings → AI Summarization and toggle Enable Ollama Summarization on.
- Confirm the Base URL (
http://localhost:11434) and Model (e.g.llama3.2), then press Test to verify Feedlight can reach Ollama and the model is installed.
What you get
Once enabled, the reader gains these tools:
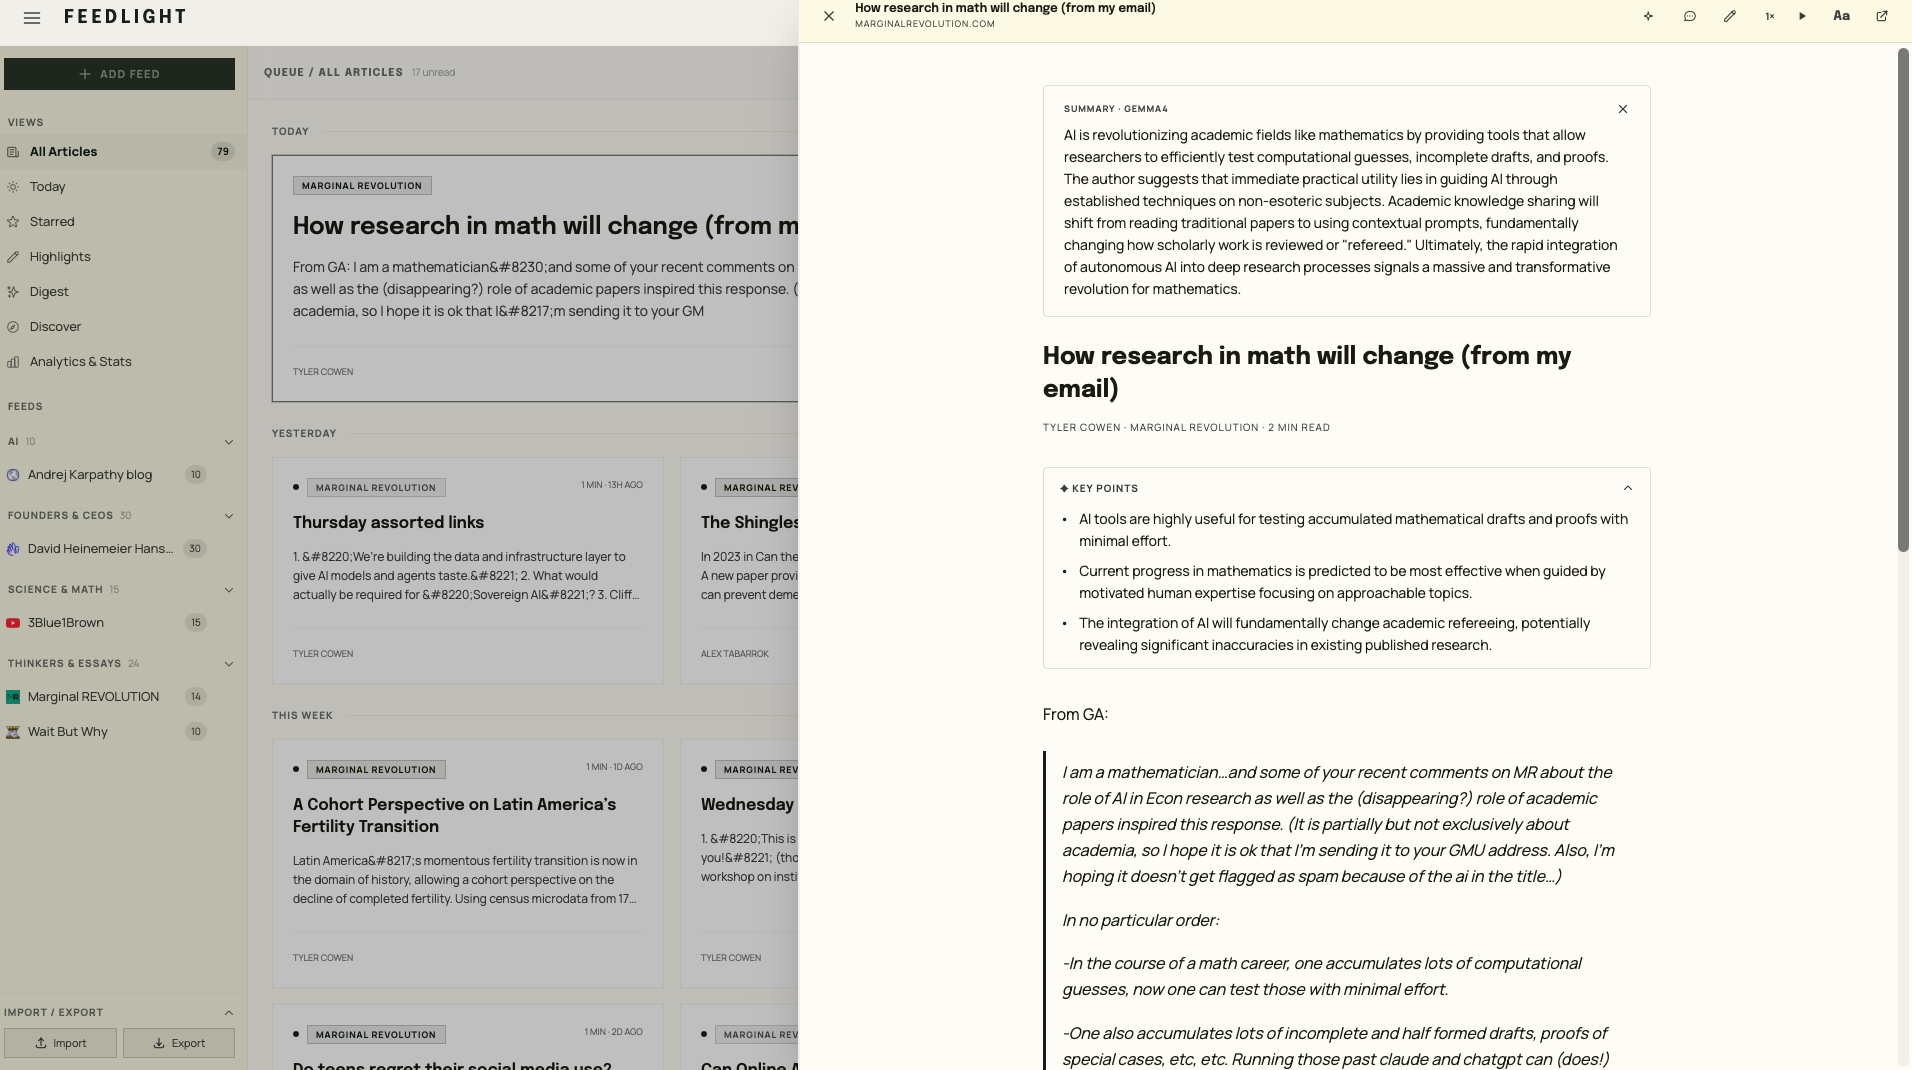
- Summarize (✦ in the reader header) — a streamed summary with automatic key takeaways.
- Ask — open a chat panel and ask questions about the article, with suggested questions to get going.
- Explain / Ask from a selection — select text and choose Explain for an instant explanation, or Ask to quote it into a question.
Today's Digest
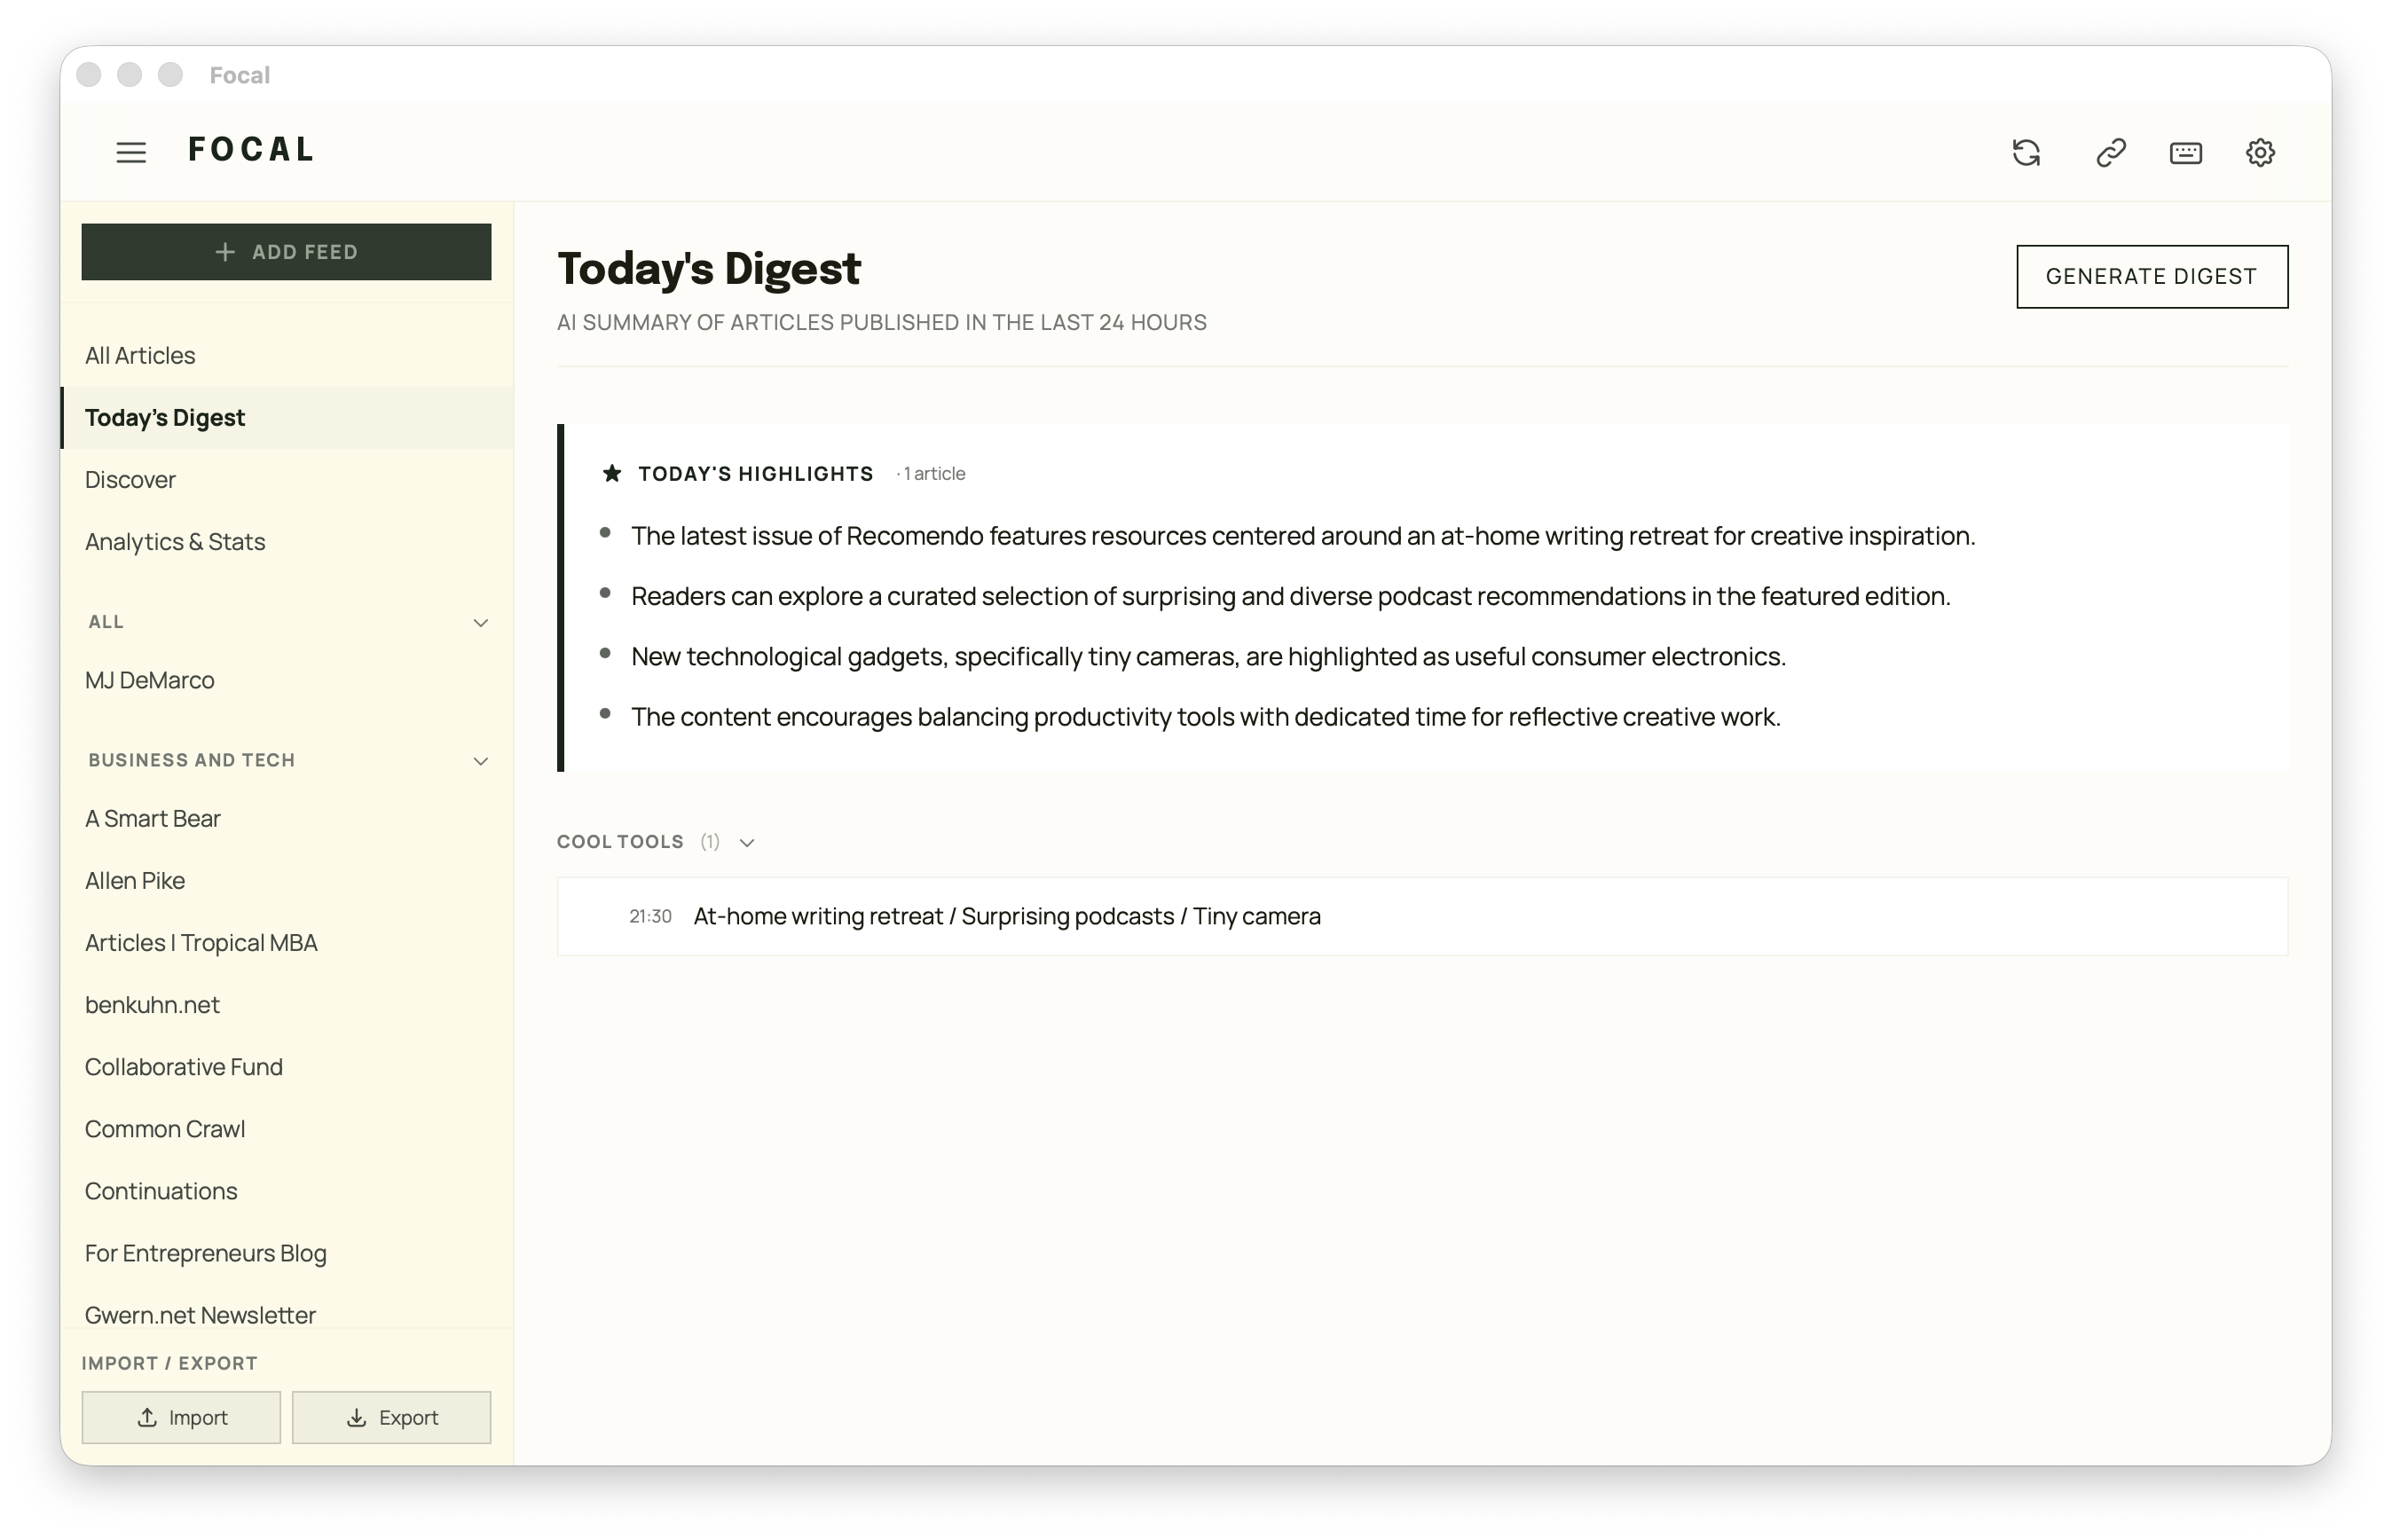
The Digest view turns the last 24 hours of articles into a focused briefing. Press Generate Digest and Ollama writes a short bulleted summary of everything new, followed by the underlying articles grouped by source so you can dive into anything that catches your eye. Requires AI features to be enabled.
Analytics
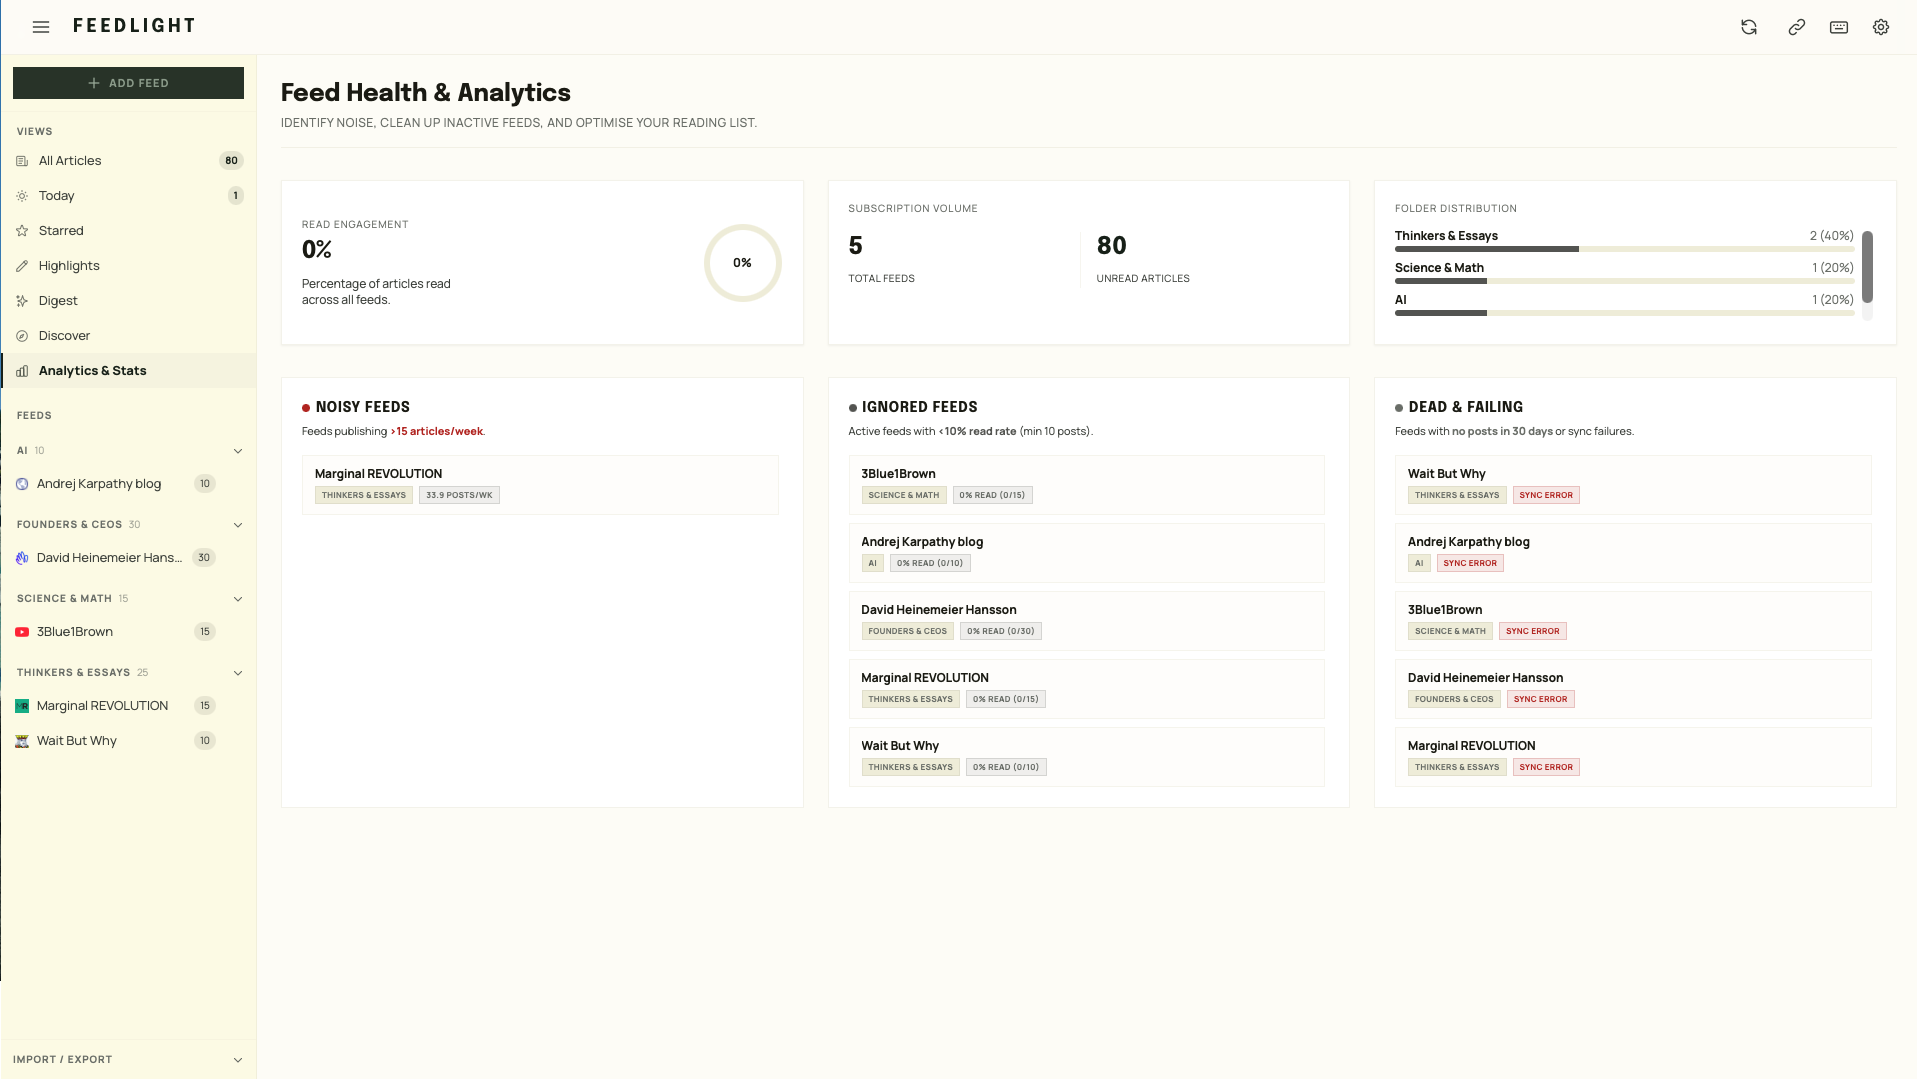
The Analytics & Stats view helps you keep your subscription list healthy. It shows your overall read-engagement rate, subscription volume, and folder distribution, then flags three kinds of feeds worth reviewing:
- Noisy Feeds — publishing more than ~15 articles a week.
- Ignored Feeds — active feeds you read less than 10% of (minimum 10 posts).
- Dead & Failing — no new posts in 30 days, or feeds that are failing to sync.
You can unsubscribe straight from each flagged feed to declutter in seconds.
Obsidian export
If you keep notes in Obsidian, Feedlight can write your
highlights straight into your vault. Set the absolute path to a folder inside your vault in
Settings → Export → Obsidian Vault Folder (for example
/Users/you/Documents/Vault/Feedlight).
Then, in the Highlights view, click Send to Obsidian on any article. Feedlight writes one Markdown file per article — the title and source link, followed by each highlight as a blockquote with its note underneath. Prefer to paste it yourself? Copy gives you the same Markdown on your clipboard.
Settings reference
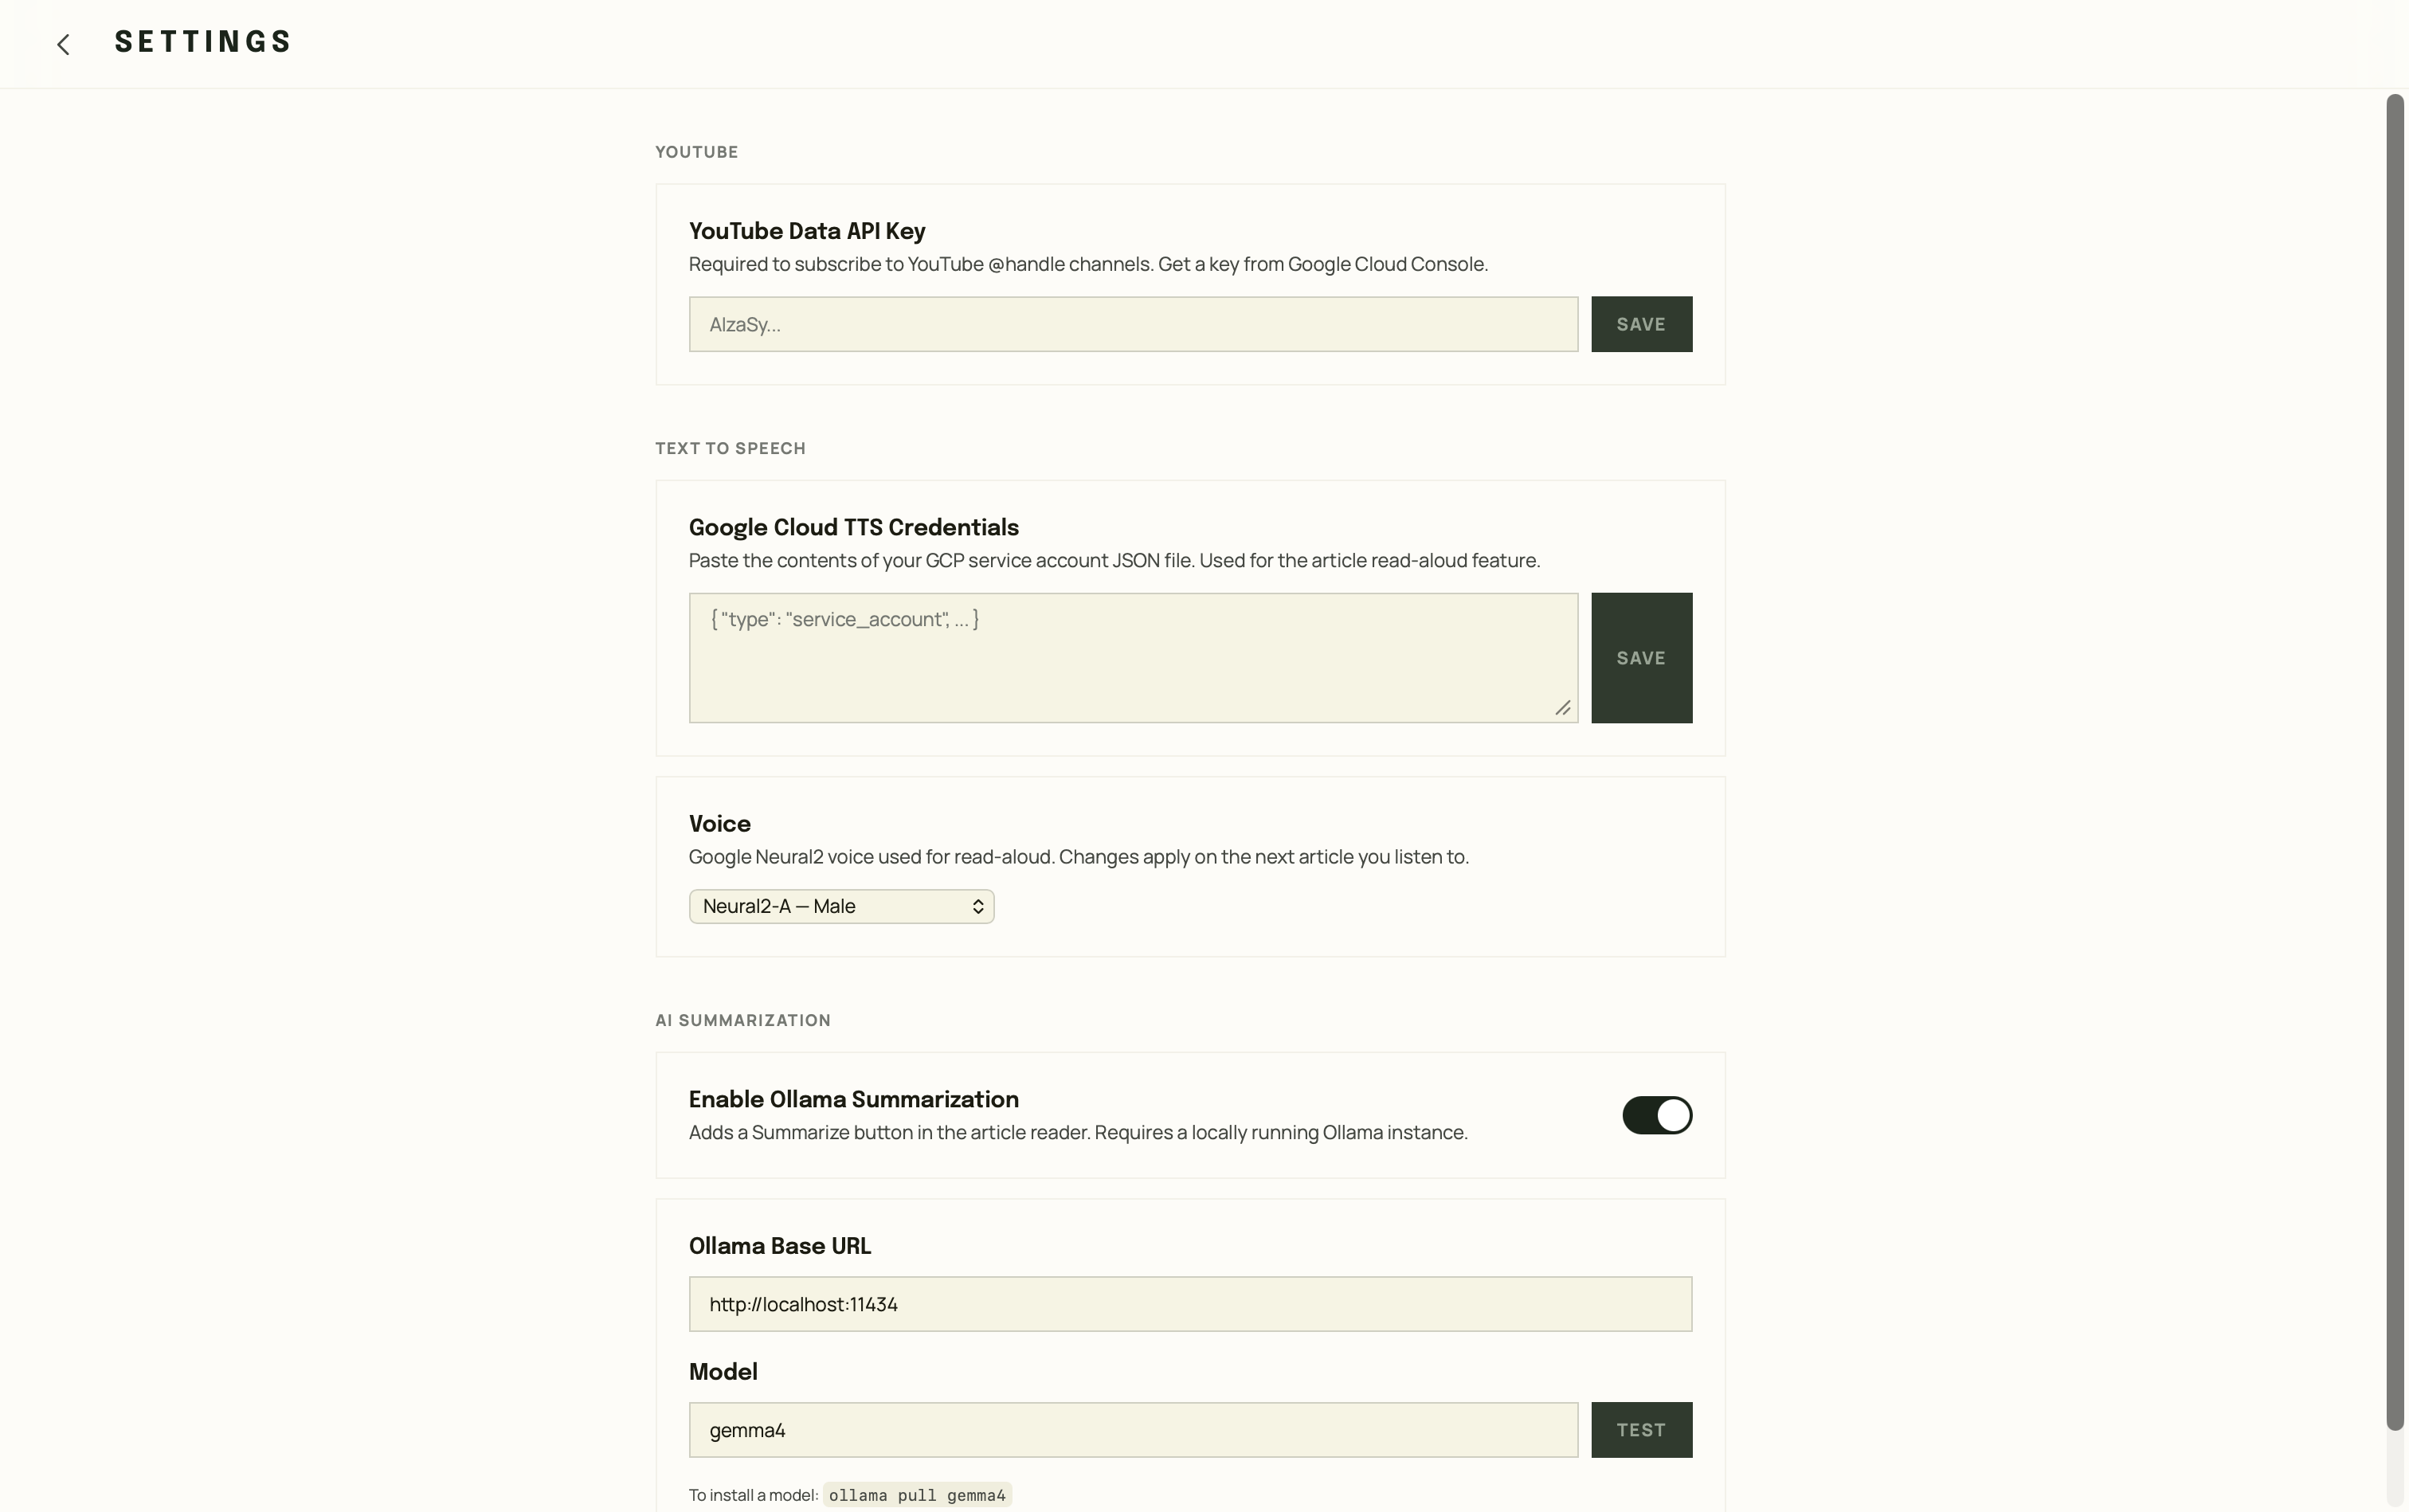
Open Settings from the gear icon in the top bar. Everything is optional except what you choose to use.
| Section | Setting | What it does |
|---|---|---|
| Appearance | Theme | App-wide Light, Dark, or System (follows macOS). The reader keeps its own theme setting. |
| YouTube | YouTube Data API Key | Lets you subscribe to @handle YouTube channels. |
| Read Aloud | Voice engine | Choose System (free, offline) or Google Cloud voices. |
| Read Aloud | Google API Key | Paste a Google Cloud API key to use Google's voices. |
| Read Aloud | Voice | Pick any available Google voice (default en-US-Neural2-F). |
| AI Summarization | Enable Ollama | Turns on local AI summaries, chat, and digest. |
| AI Summarization | Base URL & Model | Where Ollama runs and which model to use; Test verifies the connection. |
| Export | Obsidian Vault Folder | Destination folder for Send to Obsidian. |
Keyboard shortcuts
Feedlight is built to be driven from the keyboard. Press ? anytime to see this list in the app.
| Key | Action |
|---|---|
| j | Next item |
| k | Previous item |
| o / Enter | Open article pane |
| m | Toggle read / unread |
| s | Toggle star |
| Shift+A | Mark all visible items as read |
| / | Search |
| Esc | Close article pane |
| ? | Show keyboard shortcuts |
Privacy & data
Feedlight is local-first by design. Your subscriptions, articles, read state, highlights, and notes are stored in
a SQLite database on your Mac, and your API keys and credentials are kept locally via
tauri-plugin-store. There are no accounts and no telemetry.
Network requests only happen for things you'd expect:
- Fetching the feeds and article pages you subscribe to (feeds also refresh automatically every 15 minutes in the background).
- Loading site favicons.
- Resolving YouTube handles (only if you add a YouTube API key).
- Google Cloud TTS (only if you enable read-aloud).
- Your local Ollama instance (only if you enable AI features — this never leaves your machine).
Troubleshooting
“The app can't be opened because the developer cannot be verified.”
This is expected for an unsigned app. Follow the First launch steps to allow it.
A feed won't add.
Make sure the URL is reachable in a browser. For sites without an obvious feed, try the site's home page and let auto-discovery find it, or search the site for an RSS link. For @handle YouTube URLs, you need a YouTube API key.
AI features say Ollama isn't enabled or reachable.
Confirm Ollama is running (ollama serve) and the model is pulled (ollama pull llama3.2). In Settings → AI Summarization, check the Base URL and press Test — it tells you whether Ollama is reachable and whether the model is installed.
Read-aloud does nothing.
System voices need no setup. For Google voices, make sure the Text-to-Speech API is enabled on your project and the engine is set to Google. Re-paste the API key in Settings → Read Aloud.
Send to Obsidian fails.
The vault folder must be an existing absolute path. Double-check the path in Settings → Export.
Still stuck? Open an issue on GitHub. Feedlight is free and open source under the MIT license.